
Many of you might not know about “Android Penetration Testing. We must tell you that it’s such an amazing set of practices that can save you time and money while recovering from a cyberattack on your Android device.
If you want to learn more about “Android Penetration Testing, then this article is right for you. It will teach you a lot about Android Penetration Testing. These techniques can help companies train their employees to secure their Android devices from being victimized by unknown cyber-attacks.
What is Android Penetration Testing?
It involves evaluating the security of an Android operating system (OS) and the applications that are connected to it to find gaps and flaws that nefarious actors might exploit. Additionally, it entails a number of standardized examinations and assessments to assess
- The Security Posture of Android Devices and Apps,
- The Overall Mobile Ecosystem,
- Strengthening Security, and
- Mitigating Potential Risks.
Why is Android Penetration Testing Important?
There are several reasons why Android Penetration Testing is essential for the organization, clients, or any individual. Following are some of the causes for the essentiality of “Android Penetration Testing.”
- Security Assessment
- Data Protection
- Regulatory Compliance
- Risk Mitigation
- User Trust
- Application Security
- Evolving Threat Landscape
- Network Security
- Third-Party Integrations, and
- Continuous Improvement.
Android Package (APK) File Structure Explained
I have explained the basic structure of an APK File so you can understand how the structure works.
- META-INF Folder:
- MF: This file contains a manifest file that lists the files that make up the APK and provides cryptographic signatures that can be used to confirm the APK’s integrity.
- xml:
- The XML file in question is an essential part of an APK. It includes vital details about the application, like the package name, permissions, functions, services, and broadcast receivers. It acts as a guide for how the Android system should interpret and communicate with the app.
- arsc:
- This file, which is a binary file, houses the app’s built resources, including strings, layouts, and styles.
- res Folder:
- This directory has several subdirectories that house the assets required for the user interface and functionality of the app, such as layout XML files, drawable pictures, values (such as strings.xml for internationalization), and other assets.
- Assets Folder:
- Any random files that are not compiled but are included with the application for use at runtime may be found in this directory. The Android Asset Manager is commonly used to access these files.
- lib Folder:
- If the application contains native code, this directory may contain native libraries that have been compiled for various CPU architectures (such as armeabi-v7a, arm64-v8a, x86, etc.).
- dex:
- This file contains the compiled Java bytecode known as Dalvik Executable (DEX), which is executed by Android’s runtime (formerly known as Dalvik, currently known as ART). It includes the logic of the app’s code.
- Resources Folder:
- Before they are built into the resources.arsc file, this directory contains additional resources, such as localized string and layout resources, in a more legible format.
- META-INF Folder (continued):
- RSA, CERT.SF, MANIFEST.MF: In the APK’s digital signature, these files are included. By confirming that the APK hasn’t been tampered with, they guarantee its validity and integrity.
- Assets Folder (continued):
- The assets folder could also include other subdirectories and files the app requires.
- Other Files:
- The APK may also contain additional files and directories, such as third-party libraries, extra configuration files, and unique resources, depending on the app.
Start with the OWASP Mobile Top Ten to find vulnerabilities.
| S.No. | Vulnerabilities | Define |
| 1. | Improper Platform Usage | It relates to problems caused by improper usage of APIs and capabilities on mobile platforms. The proper usage of platform-specific security features should be understood by developers. |
| 2. | Insecure Data Storage | Sensitive data is frequently stored locally on mobile apps. If not adequately protected, vulnerabilities in insecure data storage can result in data leakage. |
| 3. | Insecure Communication | Sensitive data may be exposed to interception by hackers during data transmission if encryption and security measures are inadequate. |
| 4. | Insecure Authentication | Unauthorized users may access an app or its data through weak or poorly configured authentication procedures. |
| 5. | Insufficient Cryptography | Sensitive data may be compromised due to weak or badly applied cryptography algorithms. |
| 6. | Insecure Authorization | Users may be able to take actions they are not permitted to take due to flaws in the authorization process, which could result in unauthorized access or privilege escalation. |
| 7. | Poor Code Quality | Buffer overflows and injection attacks are examples of vulnerabilities that can be introduced by using unsafe coding techniques in the client-side code of the app. |
| 8. | Code Tampering | Attackers might try to change the code of the app, which could lead to unauthorized changes, data manipulation, or the introduction of harmful code. |
| 9. | Reverse Engineering | In order to find weaknesses, steal intellectual property, or produce fake versions of the software, malicious actors may try to reverse engineer it. |
| 10. | Extraneous Functionality | The attack surface of the program can be expanded by including pointless features and functionality, potentially putting it at greater risk for security breaches. |
Suggested Tools for Android Penetration Testing
Some of the popular tools that you can use for Android Penetration Testing are as follows.
- OWASP ZAP (Zed Attack Proxy)
- Burp Suite
- MobSF (Mobile Security Framework)
- QARK (Quick Android Review Kit)
- AndroBugs Framework
- Drozer
- APKTool
- Frida
- dex2jar and JD-GUI
- Android Emulators and Virtual Devices
- Proxy Tools (e.g., Charles Proxy, Fiddler)
- Wireshark, and
- Custom Scripts and Exploits.
Setting up the Pentesting Environment for Android
If you want to test Android devices and apps, you must have a real or virtual device with you. The Android Studio IDE (Integrated Development Environment) comes with an Android Virtual Device (AVD), which is a nice place to start.
Today’s Android and iPhone smartphones use the ARM CPU architecture. The CPU architecture is related to kernel exploitation. Since most emulators virtualize non-ARM CPU architectures, it is impossible for a pentester to use a mobile emulator to evaluate a prospective new kernel exploitation approach. Fortunately, Corellium and Genymotion use ARM-based virtualization to resolve this issue.
It’s really simple to install Android Studio on Linux. Simply unzip it and execute the studio.sh file located in the bin/ directory. It is necessary to follow the setup procedure to install Android Studio on Windows or macOS.
Both operating systems basically follow the same method. For instance, on Windows, we click the executable and then proceed to follow the setup wizard’s instructions.
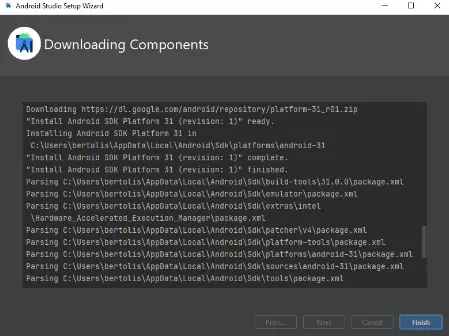
- Just a few components need to be downloaded after the installation is finished.
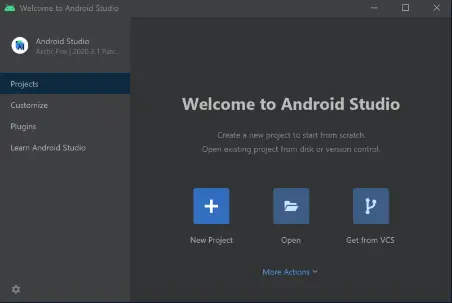
- Click Finish and then New Project after you’re finished.
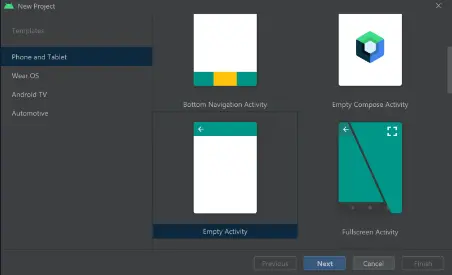
- In the next window, select Empty Activity, and then click Next.
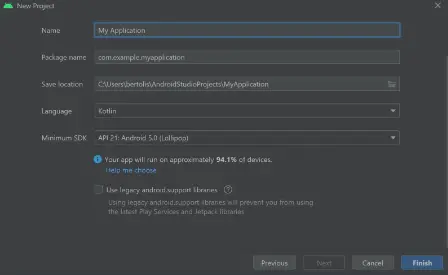
- To finish the procedure, click Finish at the end.
- After starting a new project, all that is left to do is wait for a few additional files to be downloaded from the IDE automatically.
- After completing that, click in the IDE’s top center (as seen below) and choose AVD Manager.
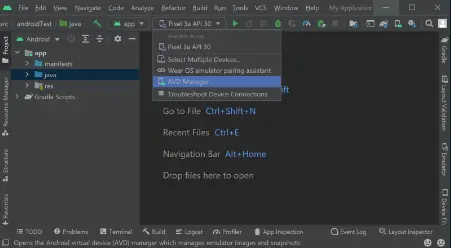
- To launch the emulator, select the green Play button from the AVD Manager menu.
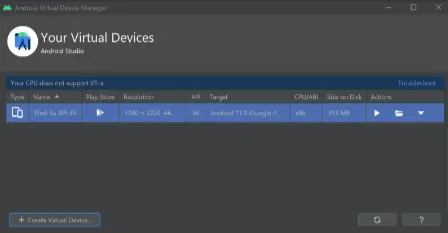
- When the gadget is running, it should seem as follows:

Five Effective Android Penetration Testing Techniques
- Local Data Storage Enumeration
We require access to a real or simulated device to list the file structures of installed applications. The Android Debug Bridge (ADB), a command-line tool that enables direct communication with the device, might be used to accomplish this.
We can install and debug applications using ADB, and we can run commands on the device using the Unix shell it offers.
Simply type sudo apt install adb to install ADB in Linux. When the adb client is installed, an adb server is also started, automatically establishing connections to all active devices.
In the event that this fails, we must manually establish the connection by doing what is shown below:
- Connecting via ADB Manually
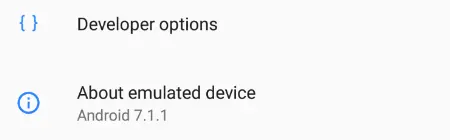
- First, we turn on the device’s USB Debugging feature.
- We tap on Settings to do this,
- Next, depending on the device, tap on About Device or About Phone.
- Then we scroll down and tap on the Build Number seven times until the message “You are now a developer!” pops up.

- After that, tap the back button again to enter Developer Options.
- Next, scroll down to the Debugging area, where you can find and turn on the USB Debugging option.
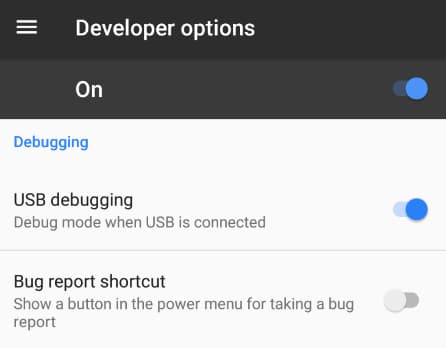
- After USB Debugging has been enabled, we can now install ADB on Linux by typing sudo apt install adb.
- Returning to our Android device, we click Settings, pick Wi-Fi, and then tap Done.
- To obtain an IP address, hit the gear icon in the top right corner of the screen.
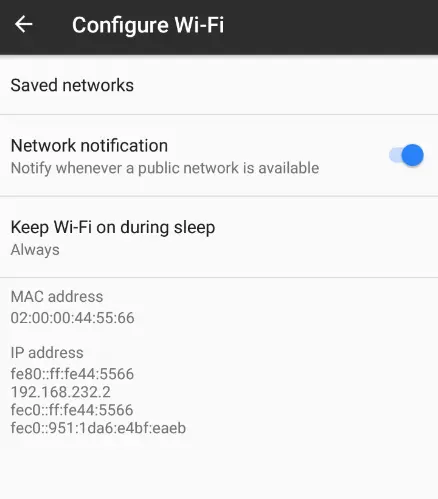
- After getting the IP, we type adb connect 192.168.232.2:5555.
- Additionally, a local adb server that is ready for connections will be started by this action.
- As per the official ADB literature, the emulator will make an effort to connect to port 5555, which is the first port in a series.
- Once the connection has been established, we can type adb devices to view a list of the connected devices.
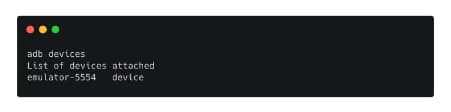
- The format of the associated devices might be either name-port or IP-port. The device in question is designated as emulator-5554.
- Important Directories
It is necessary to be aware of the following directories because they are the most important ones in an Android device.
- /data/data: includes every program that the user installs.
- /data/user/0: Contains information that is only accessible via the app.
- /data/app: Contains the APKs for the programs the user has installed.
- /system/app: Contains the device’s pre-installed programs.
- /system/bin: Contains binary files.
- /data/local/tmp: A world-writable directory.
- /data/system: Contains system configuration files.
- /etc/apns-conf.xml: Contains the default Access Point Name (APN) configurations. APN is used for the device to connect with our current carrier’s network.
- /data/misc/wifi: Contains WiFi configuration files.
- /data/misc/user/0/cacerts-added: User certificate store. It contains certificates added by the user.
- /etc/security/cacerts/: System certificate store. Permission to non-root users is not permitted.
- /sdcard: Contains a symbolic link to the directories DCIM, Downloads, Music, Pictures, etc.
- Enumerating
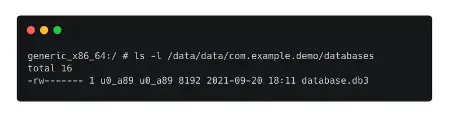
The directory /data/data/ contains the installation folders for every program that is installed on an Android smartphone. This private directory cannot be accessed by other apps or users who are not root. We can use ADB to list the files in this directory while logged in as root.
As stated earlier, the directory /data/data/ is where applications stored on the device’s internal memory can be found. Occasionally, the installation process may result in the creation of directories like databases and shared_prefs.
- Structured data that is kept in a personal database is frequently present in the database’s directory when the program is first run.
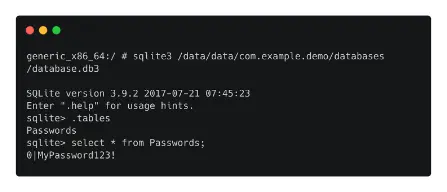
- We can list all of the accessible databases using the SQLite3 client and device access via ADB.
- Consider setting up the /data/data/com.example.demo package and storing data in a database.
- The database can then be accessed using the /data/data/com.example.demo/databases/ directory.
- The SQLite3 tool can be used to read the content of the database once it has been identified.
- Data is saved outside of databases as well.
- SharedPreferences are objects in the source code that point to XML files so that they can be read and written to.
- These XML files will eventually be saved in a directory named shared_prefs and will have a collection of key-value pairs.
- Sensitive information can be obtained by reading these files.
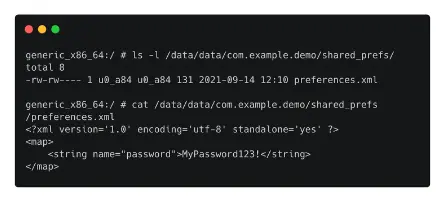
- Attacks like the one we saw earlier on information leaks can be lessened by storing any sensitive values in encrypted form.
- Additionally, because it encrypts the key-value pairs, using libraries like EncryptedSharedPreferences might be a suitable option for protecting the content of the XML files.
- Extracting APK Files
Reverse engineering an APK file might result in getting around several security precautions. With the use of free and open-source programs like
- Dex2jar,
- JADX,
- JD-GUI,
- APKTOOL, and
- Many Others.
Let’s look at how to reverse an app and leverage the knowledge we get from the source code to get around an authentication system.
- Finding the APK Online
Finding the APK online will be the first strategy we examine.
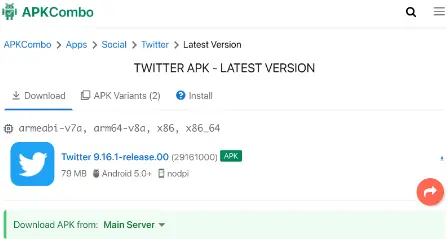
- To do this, we go to APKCombo and look for the app we want to export the APK file to. Let’s look for the Twitter app now!

- Choose the first result, then click the green “Download APK” button.
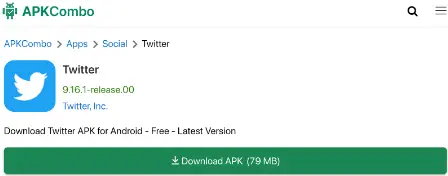
- To download the APK file, finally click on the Twitter icon.
- I’m done now. The Twitter APK was downloaded without issue.
- Extracting the APK using Third-Party Tools
An Android app called APK Export automatically downloads and stores the APK file of another app. Direct installation of APK Export is possible through the Google Play store.
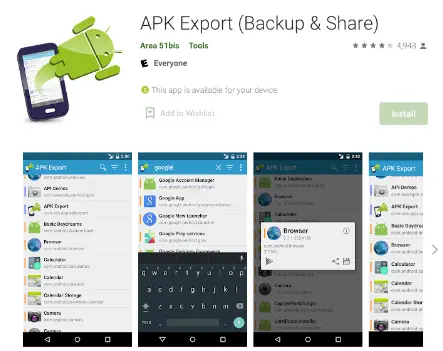
- Once it is set up, we may tap on it to launch it and then select the necessary app.
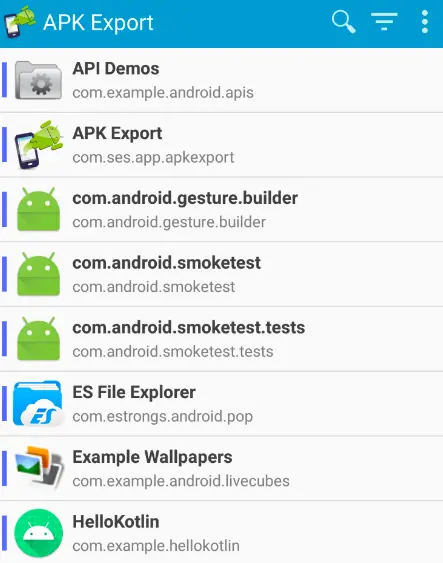
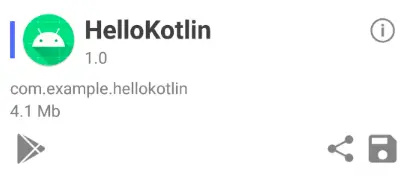
- Let’s try exporting the HelloKotlin application’s APK file. To do this, we first tap the HelloKotlin app, and then we tap the disc icon in the window’s lower right corner.
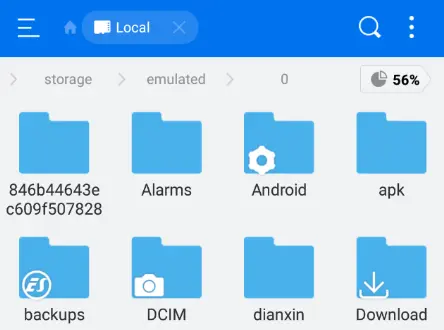
- A new directory called “apk” is then visible if we use a file explorer program to go through the file storage.
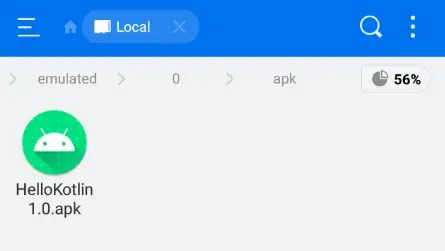
- We can now observe that “HelloKotlin1.0.apk” has been successfully exported by looking through the APK folder.
- Extracting the APK from the Device.
Assume the Google Play store does not have the application. The APK file is located in the location /data/app/package name>-1/base.apk when an application is already installed on the device.
The whole path to the APK, for instance, should be /data/app/com.example.myapp-1/base.apk if the package name is com.example.myapp.
We can see that the package name is followed by a number. This is a random string in some Android versions and a sequence number in others. It is difficult to determine the whole package name of the app since non-root users cannot read the contents of the directory /data/app/.
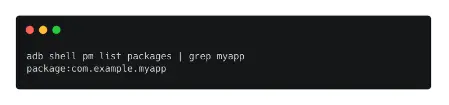
Since the app name typically forms a component of the package name, we may type the following command to obtain the package name.
adb shell pm list packages | grep myapp
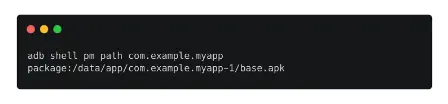
The following command is used once we have the package name to obtain the whole path to the APK file.
adb shell pm path com.example.myapp
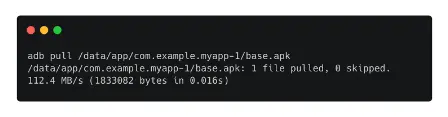
To get the base.apk file, we can type the following command.
adb pull /data/app/com.example.myapp-1/base.apk
- Reverse Engineering using JADX
Let’s go on to the process’s next step, reverse engineering the APK.
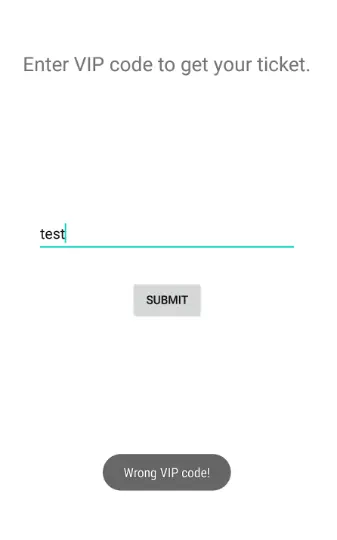
- We can see that the program’s primary purpose is to request a VIP code, and if this code is validated, it delivers a ticket. This is assuming that the application is installed in an AVD.
- Let’s reverse the APK file now to look at the source code.
- We may open the APK file directly with JADX-GUI and read the Java pseudocode of the program.
- By entering apt install jadx or by downloading it from GitHub, you can install this program on Linux using the APT package manager.
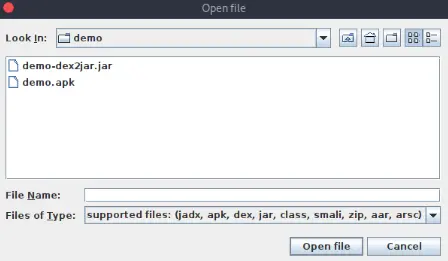
- To launch the application and load the demo.apk file, type jadx-gui.
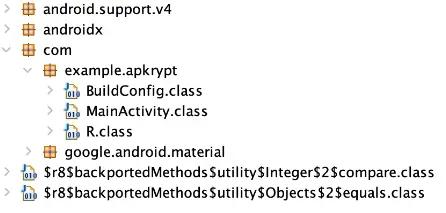
- After that, we can explore the application’s architecture.
- The packages and files that make up the APK file are shown on the left side of the interface.
- Source code may occasionally be obscured. Making the code challenging to read for humans is called obfuscation.
- ProGuard is the code obfuscation tool used by Android Studio.
- Java code can be shrunk, optimized, and obfuscated using the free and open-source command-line utility ProGuard.
- You can add more rules in a file named proguard-rules.pro found in a new Android Studio project’s Grandle Scripts folder.
- The source code is not fully illegible only because it has been obscured.
- All method names are altered when using ProGuard to obfuscate, replacing them with letters like a, b, etc.
- This will make it challenging for someone to comprehend how the program works, making it somewhat resistant to reverse engineering.
- Code obfuscation is not, by default, enabled in Android Studio. The build.gradle file’s boolean variable minifyEnabled must be set to true to make it active.
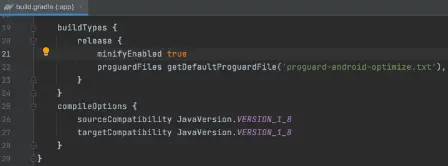
- Read the official documentation on ProGuard and Android Studio here for more details.
- The source code for the application is visible in the right window of the JADX-GUI.
- Let’s examine the MainActivity.class class’s source code.
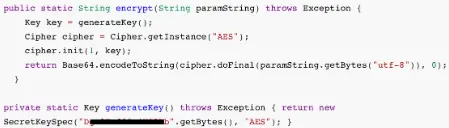
- This code snippet shows that the string that is sent to the user if the correct password is entered is encrypted using the AES method.
- Additionally, the encryption’s secret key is made public.
- The ciphertext can be found by carefully scrutinizing the source code, especially the following piece.
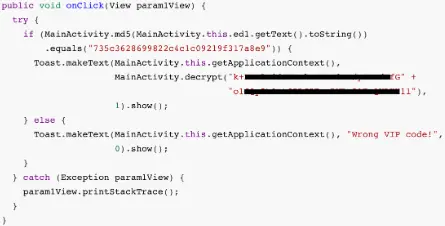
- We have all the knowledge necessary to write a script to decrypt the ciphertext in the APK file’s source code.
- Any language that we pick can be used to write the script.
- By using techniques like these, we may reverse any APK file to examine the source code’s flow and modify or obstruct the intended functionality.
- Decompiling and Recompiling the APK File
Apktool is a great additional tool for Android reverse engineering. It can also be used to study an application’s obfuscated code further. The primary function is the ability to disassemble the APK, which enables reading and editing of the source code and rebuilding the resources into the APK file. This enables the user to modify the application’s functionality.
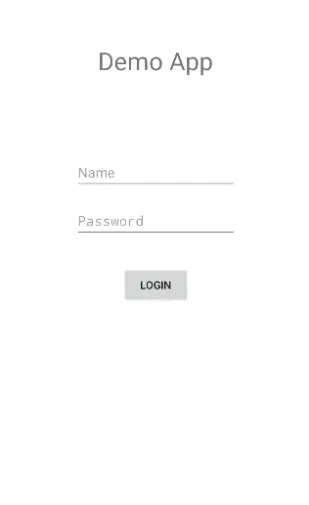
- Let’s say we wish to try to avoid the login screen for the following program.
- We’ll attempt to reverse engineer the application to accomplish this, locate the line of code that validates user input, alter it, and then recompile it.
- We’re going to use Apktool for this.
- We will receive the Smali code from Apktool.
- Comparatively speaking, Java pseudocode provided by JADX is easier to read than Smali code.
- Let’s first examine the apk file with JADX to get a clear picture of the source code flow.
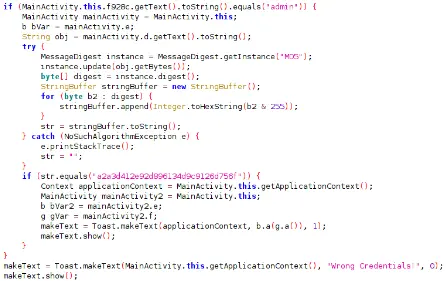
- The code snippet seen above exposes an if statement that appears to examine the user name and password.
- More specifically, it appears that the embedded if statement compares the user input’s MD5 value to an already-existing MD5 string and displays a message if they match.
- If not, the message “Wrong Credentials” is shown in its place.
- Let’s use Apktool to look for and edit this piece of code.
- On a Linux system running Debian, type apt install Apktool to install it.
- The APK file will then begin to be disassembled once you type Apktool d demo.apk.
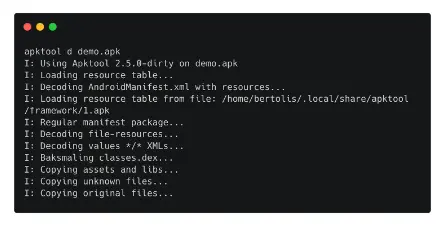
- After the decompilation is complete, we may list the contents of the generated file demo.
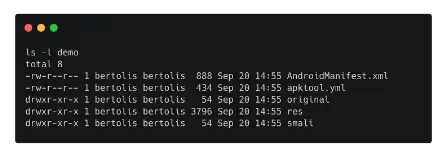
- We can see that Apktool has broken down AndroidManifest.xml.
- As we already discussed, this file contains details on the package name, functions, resources, version, and other elements of the program.
- For the purpose of enumerating an APK file, this file contains crucial information.
- In addition to this file, the directory smali is also visible.
- Dalvik, the Java VM implementation used by Android, uses the dex format. Smali code is an assembler/disassembler for this format.
- It is a symbolic language, similar to the Assembly code in a C program, in other words.
- Java classes are packaged in a dex (Dalvik Executable) file format, as we previously explained, so that the Android Runtime may run them.
- Since we have access to the smali code, we can use Apktool to read, modify, and recompile it.
- The app’s decompiled Activities are displayed below:
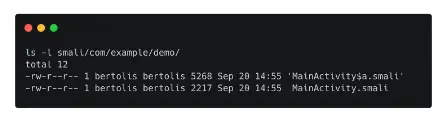
- Open MainActivity$a.smali and have a look inside.
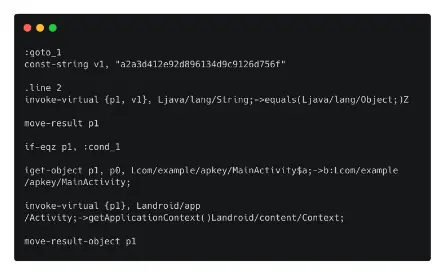
- The line with the MD5 string and the if statement that determines whether the MD5 value of the user input matches this MD5 string can be found after a little bit of scrolling down.
- Let’s try to modify this sentence such that it checks to see whether the input matches this MD5 string.
- When we enter the wrong password, the software will let us log in this way.
- To accomplish this, the instruction if-eqz must be changed to if-nez.
- The modified code and resources will then be recompiled, and a new APK file will be produced.
- To achieve this, we enter the command below and provide the name of the directory that was made when we decompiled the demo.apk file as an argument.
Apktool b demo
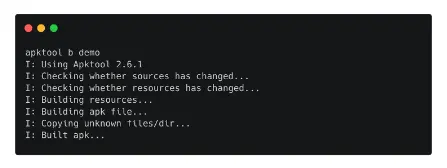
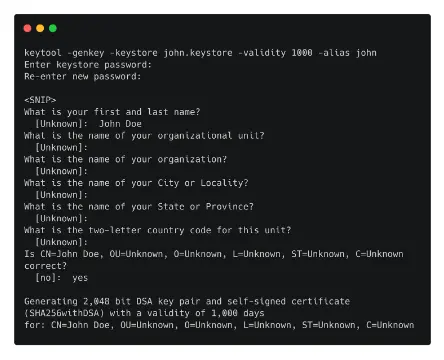
- If the build goes well, as seen in the image above, all that is left to do is install the newly formed APK file on our device by signing it with a self-signed certificate.
- Keytool -gen-key -keystore john.keystore -validity 1000 -alias john is the first command used to create a new key.
- The APK file is signed by typing the following after our key has been generated:
- jarsigner -keystore john.keystore -verbose demo/dist/demo.apk john
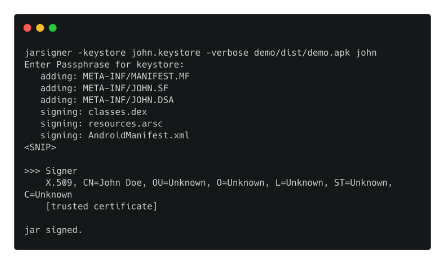
- The APK file, which may be found in the directory ./demo/dist/demo.apk, was successfully signed.
- We must first remove the current version before installing the new one on the device.
- Either the UI or the terminal can be used to accomplish this: uninstall com.example.demo with adb.
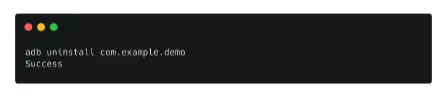
- Now that the new APK has been downloaded, we can install it by typing the command adb install demo.apk.

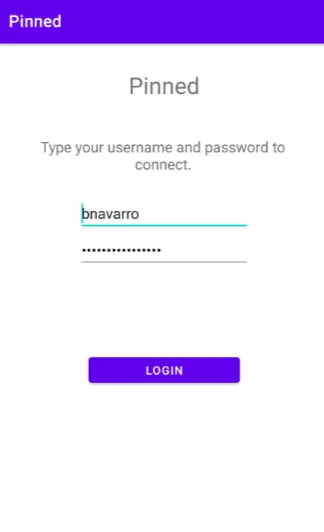
- We locate and tap on the Demo application from the UI.
- We open it, enter a random password, and then type the username admin that we saw on the source code in the previous stage.

- We have successfully avoided this app’s login screen because the message “Login Successful!” appears on the screen.
- Additional reverse engineering methods can be applied for static and dynamic analysis using programs like Ghidra and Frida, but we’ll cover those in a subsequent blog article.
- Intercepting Network Traffic
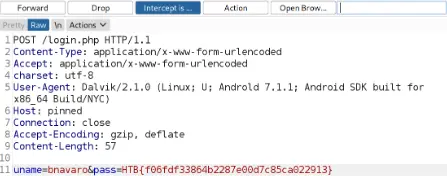
Using Burp Suite, intercepting HTTP requests in Android is a simple process. Android apps frequently use servers to process or store data remotely. One could intercept requests and responses sent over the HTTP protocol and read the data being exchanged between the app and the server.
Let’s look at a case where the app has a login form that sends the user’s information to a distant server for authentication. The user’s credentials from a prior session are also retained in this app, but the password is masked and, therefore, unreadable.
- The password could be accessed by intercepting the HTTP request if the app employs a remote service to authenticate the user.
- Under Settings -> Proxy, the Android Virtual Device (AVD) has a setup tab where the proxy preferences can be customized.
- Set the IP address of the host and port 8080 after selecting Manual Proxy Configuration.
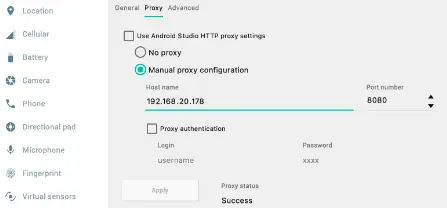
- After configuring the proxy settings on the AVD, we must change the proxy server’s IP address from localhost to the host’s local IP address.
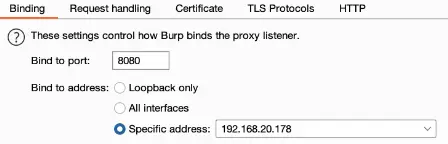
- Once this is finished, we can utilize Burp to launch the proxy server before clicking the app’s login button.
- The intercepted request may be seen below, along with the user’s login information in plain text.
- Secure Sockets Layer (SSL) can be used to reduce problems like these.
- Android SSL implementation can be done in a number of ways.
- However, methods to get around these implementations have also been created.
- As an illustration, SSL Pinning is a method used to stop man-in-the-middle attacks.
- This method either embeds the certificate as a string in the source code or pins the certificate to the app bundle (Certificate Pinning).
- We may alter the code of an application while it is running thanks to the well-known framework called Frida, which is utilized in mobile evaluations.
- SSL pinning can be avoided by inserting code into the APK using Frida.
- A subsequent blog article will examine the Frida framework in further detail.
- Forensics can help form a more detailed picture of mobile security.
Reverse engineering might not always reveal the full extent of a malware infection or a hacked app’s harm. Forensics can help in this situation. Making a copy of the disk image on Android devices allows for additional analysis using programs like Autopsy.
Autopsy is a reliable Windows-compatible open-source digital forensics platform. This utility can read databases, EXIF data, SMS and phone call logs, the history of a web browser, and much more. It can also help you recover deleted files and photographs from the disk.
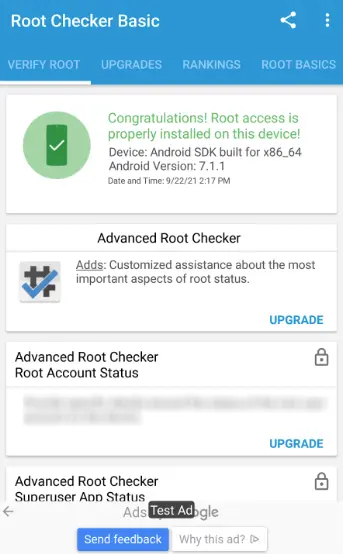
Devices that are rooted can acquire Android disk images. One can root an Android device in a variety of methods. It is important to note at this point that rooting a device is not the same as having root access to the device’s terminal.
- You may simply root an AVD, such as the Nexus 5X we previously configured in Android Studio, by following the instructions in this GitHub project.
- After successfully rooting the smartphone, the results of the application RootChecker are displayed in the next image.
- Once the device has been rooted, the dd Unix software can be used to obtain the disk image.
- We also need to introduce the program BusyBox at this time.
- A collection of software called BusyBox bundles a number of Unix tools into a single executable file.
- On a rooted device, it can be installed using ADB.
- The partition that is mounted on the ‘/data’ directory is the one we need to acquire, presuming we have a rooted AVD with BusyBox installed.
- An Android device’s mounted partitions might resemble this.
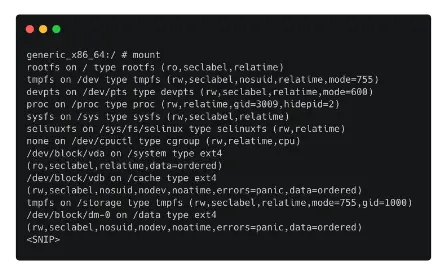
- Hardware device drivers and specialized device files appear in the file system similarly to regular files.
- The boot sector of a hard drive can be backed up using the dd command-line tool.
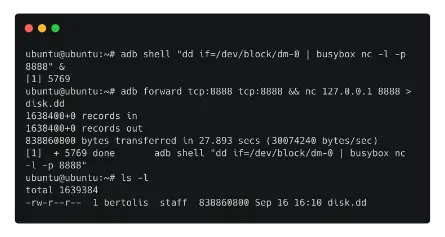
- Following the discovery of the appropriate partition, we can send the disk image to our host computer using nc from the BusyBox software and dd to acquire the disk image.
- The next command starts a listener while also acquiring the disk image.
adb shell “dd if=/dev/block/dm-0 | busybox nc -l -p 8888” &
The communication on port 8888 is then forwarded using ADB.
adb forward tcp:8888 tcp:8888
The disk image is obtained locally by running the following command at the end.
nc 127.0.0.1 8888 > disk.dd
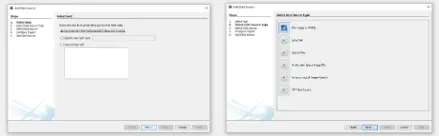
- After completing this, we may launch the Autopsy and load the disk image by following the on-screen instructions. Let’s give the new case a name first.
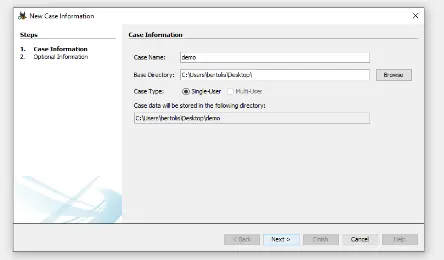
- We then assign a case number.
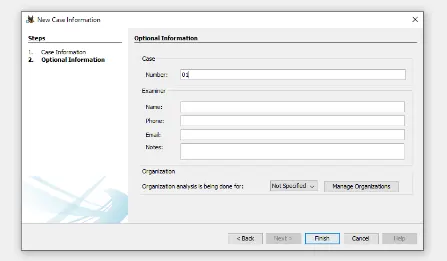
- Choose the Host Name and the Data Source Type in the following step.
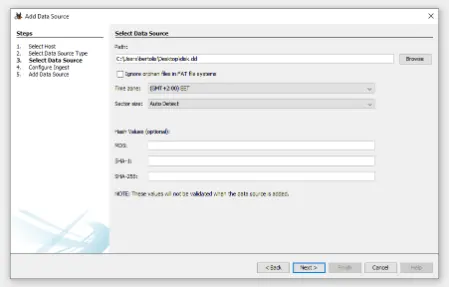
- Select the disk image that we previously got and load it as a Data Source after that.
- Click Finish and Next to finish.
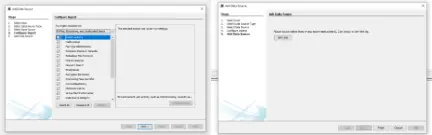
- The disk image ought to have loaded successfully by this time.
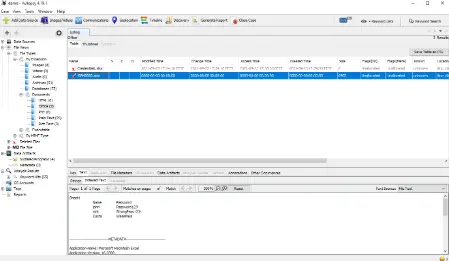
- A folding menu that lets us browse among the files that have been downloaded from the device can be seen in the left pane when we look there.
- The capability of Autopsy to restore deleted files from the device is a fantastic feature.
- The recovered version of the deleted file Credentials.xlsx is seen in the image below.
- Practice your Android penetration testing skills.
- Some of the most popular methods for evaluating the security of an Android application or device have been covered in this article.
- Since mobile devices play a significant role in our daily lives, interest in how to safeguard and hack them is anticipated to grow in the next years.
- Utilizing typical Android exploitation vectors in a practical setting is the greatest method to evaluate your knowledge of the approaches we’ve discussed.
Conclusion
Now that you know what Android penetration testing is, you need to search for professionals to teach you more skills and techniques so that you can protect your data and devices from getting attacked by adversaries/ hackers.
Adversaries are known for their amazing abilities to use hacking techniques to ensure the security of essential resources of the company related to the employees, clients, and users. If you want to learn cybersecurity skills so much, you can contact Bytecode Security which has been offering cybersecurity training and certification to IT Professionals who want to enhance their knowledge and skills in cybersecurity and ethical hacking.
Moreover, on the premises, you will get the best learning environment under the guidance of professional cybersecurity experts working for years in the IT Industry. What are you waiting for? Contact, Now!